Ear Posting for Cropped Ears and Help with setting Natural Ears
|
Ear Cropping:
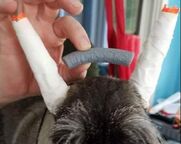
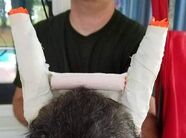
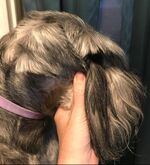
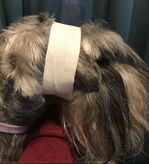
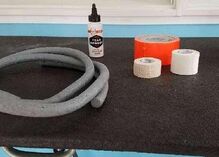
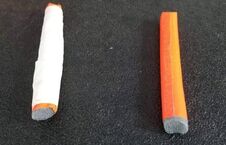
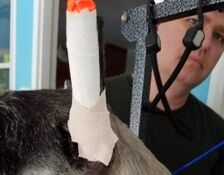
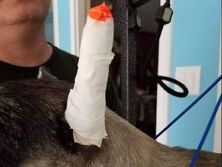
Cropping our puppy ears is a cosmetic procedure we choose to do. If you have chosen to have your puppies ears cropped, this information is for you. Cropping is an art form and no longer taught in vet schools. Finding a qualified vet who has the talent to crop is not easy, but we have chosen a vet that is one of the best. We do take this seriously and we hope you do as well. Taking care of cropped ears is time-consuming and expensive. It takes patience and persistence for as long as it takes. Puppies ears are cropped between 8-12 weeks old. Our puppies need to stay with us for at least 2 weeks post surgery to make sure the ears heal properly. Once the edges are healed we start posting them. We will demonstrate to new owners how to post before they take their pup home. We depend on you to continue posting your pups ears until they stand. All puppies have different kinds of ears and ear leather. Some ears will stand quickly and some you have to post for months. Again you must be patient and persistent. If you do not follow through with consistent posting, the ears will not stand properly. Natural ears also need care to shape them properly. This is done by taping them into place until the cartilage is set. Puppies start teething at 17 weeks or so and the calcium is pulled from the body to the teeth. You will be posting through this period until teething is nearly complete at 6 months and the cartilage sets. Please be patient. Please think about the time, work, expense that goes into this procedure. If you feel that you cannot care for a pup with cropped ears, natural ears are the other option. Remember both natural and cropped ears take work. If you choose to crop your pups ears and cannot post yourself, ask a vet or another breeder for help. There are many different ways to post ears, as long as it works. Ear Posting: Needed supplies are elastikon tape, kendall tape, duct tape, tear mender, and 1/2 inch backer rod from Lowe's. 1. Cut 2 pieces of Elastikon tape for around the base, about 4 inches long. 2. Cut 2 pieces of Kendall tape about 4 inches long. 3. Cut 4 smaller pieces of Kendall tape about 3 inches long. 4. Cut 2 pieces of Duct tape, 4 to 5 inches long. 5. Cut your backer rod the length of your dog's ears. Trim the end that goes into the ear canal at an angle. 6. Wrap backer rod in Duct tape lenthwise. 7. Take a piece of Kendall and wrap the backer rod with the Duct tape on it, sticky side out. 8. Add a bead of tear mender lengthwise to the post. 9. Stretch the ear taught and place post into the dogs ear. Make sure tear mender side to the ear and the post is down in the ear canal. 10. Take your Elastikon tape around the base of the ear, start with the tape on the sticky tape in the front of the ear and wrap around the ear, not real tight. 11. Take the Kendall 4-inch piece from the bottom of the ear to the tip and over against the sticky part. 12. Take the small 3-inch pieces around the ear. 13. Take a 6-inch piece starting at one ear and around the other ear making the brace. Natural Ear Taping: Needed: Kendall Tape As soon as you notice the pups ears straying from the correct set for more than a day or two, it is time to get out the tape. When pups leave us, the ears are set nicely. Take a photo of your pup and use it for reference. I find I have to tape the pups ears around 10 weeks old. Leave the tape on for 3 days, remove and clean the ears. Pups start to loose their puppy teeth around the 4th month and this is when the ears will often start to change. They will either flyout, up, or fold back. When you see this, start to tape again. You will have to continue to tape the ears throughout teething to get a proper set. The cartilage will set around 6 months of age. Being consistent throughout teething will give you a nice set of ears. If you do not follow through and start to tape at 6 months of age, the chances of the ear setting properly are slim. Please keep at it, it is a little bit of extra work considering you will be looking at these ears for the next 12 to 15 years. 1. Make sure your pups ears are shaved. They will stick to the tape better and stay in place better. 2. Pull forward the ear to the corner of the eye. 3. Hold the ear in place while you tape the ear. I only have the tape going half way around the head on each ear. Don't tape too tight just snug, 4. Do one long peice of tape over the ears tape, make sure you can put a thumb or 2 under their chin. Only leave on for 3 days. |
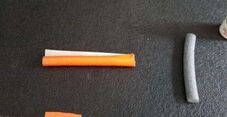
Instructions: 4-6
Instructions: 6-8
Instructions: 9-10
Instructions: 11-12

Instructions: 13
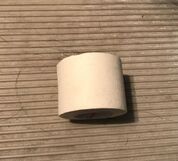
Supplies: Kendall tape for natural ears. 1 1/2 inch.
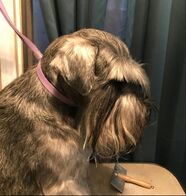
Correct Ear Set
|